Tuesday, 9 June 2020

Tuesday June 9th

TECHNICAL DIFFICULTIES-

As you might know I am still having some difficulties- both power outages and spinning wheels of death. It is most likely because I have too many large photos on my desk top.

So I give you this image of the mom raccoon who lives in one of my trees who has 4 babies. I am not a nature photographer but I enjoyed trying. It was taken with my DSLR (a Nikon D810 lens 70-300mm). My photos from my phone were awful!


Thursday, 4 June 2020

Thursday June 4th

Graffiti Alley. Bhumsoo Kim, June 3, 2020. Ann Arbor, MI

Your last image for this class will be one in which you express something that you believe to be an injustice that you would like to see changed. You will need to take a picture or pictures in which you feel it expresses this change. The images will need to include TEXT either in the picture or text you add with Photoshop or Photopea.com.

The intent of Project 17 is to give everyone one a voice through the lens of Social Justice. The guidelines to this Project is as follows:

No intentional exclusion (focus on the group you are promoting)
No harm
No violence
Show respectful for all 

Common themes for Social Justice are: 
unfair labor practices, racial discrimination, discrimination due to gender, orientation, ethnicity and age but are not limited to this.

Please contact me with any concerns or your process if you get stuck.

The artist's work for this project is vBarbara Kruger  http://www.barbarakruger.com/

Her work uses PostModern Principles- Recontextualization, Text & Image and Appropriation (the photos are not hers).


Recontextualization
Positioning familiar imagery in relation to pictures, symbols, or texts that it is not usually associate with. 
 A process that extracts text, signs or meaning from its original context in order to introduce it into another context.  Since the meaning of texts and signs depend on their context,  recontexturaliation implies a change in the communicative purpose to. 

Text and Image
Creating meaning through the combined interplay of text and imagery.  Artists working in this style often combine images and text that don't obviously go together.   This results in a piece of work that build meaning that is beyond the text and image alone.  Combined they create a stronger meaning. 

Appropriation
To appropriate is to borrow. Borrowing imagery from historical and mass media sources, such as found photos and advertising.  Through the act of borrowing, the artist manipulates, adds to.  Appropriation is the practice of creating a new work by taking a pre-existing image from another context—art history, advertising, the media—and combining that appropriated image with new ones. Or, a well-known artwork by someone else may be represented as the appropriator’s own. Such borrowings can be regarded as the two-dimensional equivalent of the found object. But instead of, say, incorporating that “found” image into a new collage, the postmodern appropriator redraws, repaints, or rephotographs it. This provocative act of taking possession flouts the modernist reverence for originality.

Tuesday, 2 June 2020

Tuesday June 2nd

The past week or so has been rather active. We have seen the power of Photography working to inform or to incite- depending on the perspective. That is what makes Photography magical and tragic. Please find your truth in all that you are exposed to.


The Skyline Counseling Team will be offering sessions for students to have an open space to talk about and/or get support for at least the rest of the week from 2-3pm on the recent events going on in our nation. The google meet is: meet.google.com/wxh-ikqo-dsv


Thursday, 28 May 2020

Tuesday May 26th and Thursday May 28th


This week is the week to make sure your work is PUBLISHED on your Weebly.

Seniors- If you have finished your 10 Projects and you have 10 marked collected in PowerSchool you are still REQUIRED to fill out the Week 7 Check for Understand form.

Missing or comments in Powerschool that are preventing you from getting a collected mark- READ them. I will not give credit to work that falls below 60% and it is all in the details.

NO CREDIT- If you do not complete 10 Projects for this class you will receive NO CREDIT. If this is the path you chose- you will need to let your counselor know so the paperwork that you and your parents sign can be completed for the year.

ALL LATE WORK DUE FRIDAY JUNE 12th.


Wednesday, 20 May 2020

Thursday May 21st- Hockney Video and How To Tutorial

Video and How To 
scroll down for the STEP by STEP


How To Step by Step

1. Before you begin this project you will need to have all your images in a folder and resize them in Preview. Tools- Adjust size- 4 inches by 5.33 inches.


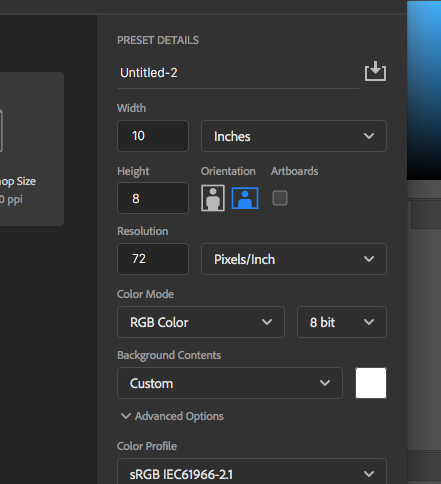
2. Once all your images are resized, you will need to open Photoshop and create a NEW 8 x 10 or 10 x 8 FILE. File- New.


3. Make.sure to title your piece (change the Untitled-2). Make sure the dropdown is inches.


4. Leave the background white for now.


5. With the folder open in your Finder, drag the first image in. And while it is selected, make it smaller, tilt it and move it into a position. Hit the checkmark, enter or return to place it.


6. If you lose the ability to move your image, click on it, use the move tool or hit command + t to Transform it.


7. Continue to add your images. You need to size them individually once they are placed in PS. It is a collage so they do not have to be straight unless you want the image to be. 


7. You can rearrange the layers. Click on the layer and drag the selected one up and down. Use the Move tool to move and Transform tool (command t) to resize and angle.


8. To add color to the background layer, find the Eyedropper (click on i to get it) and click on on image to extract a complimentary color.


9. It will select a color.


10. Find the Paint Bucket (grouped with the Gradient tool) and click on it.


10. Select the background layer if you did not already and click the background layer with the paint bucket and it will paint the background.


11. Save the file as a .PSD and take a screenshot of the finished piece because it will be to BIG or HUGE for Weebly. Post with a title and artist statement. You need 3.