Project 12- Hockney
You must use NEW IMAGES FOR THESE AND EDIT IN EITHER PS OR LR. You will need to compress your adjustment layers in PS before doing this Project
Research Hockney. Click the link on the 4th slide, watch the video on the second slide, find interviews where he talks about his photography.
Find 3 inspiration images from him or another artist that use the photo collage technique and use this to inform or inspire your work.
Take no less than 20 pictures for each of the 3 Hockney inspired images you will compile in Photoshop or Photopea.com
Compile your 3 images using the collage, montague or grid like presentation. Experiment
Try this method https://www.loom.com/share/aa4911e342154d4db5c1571fd6e5efc4 if you took 20 images and if you only took one image try the Cubist method (you do not have to make the image sepia). If you don’t have Photoshop try Photopea.com which is very similar to Photoshop
Post your 3 Hockney inspired images to your Weebly Page titled Abstract or Project 11.

Cubist Method

Hockney Video Method

Hockney Video Method
For Credit:
You will have taken no less than 20 images of 3 unique landscapes, cityscapes, buildings or scenes NOW.
You will edit in LR or PS (compress)
You will create 3 unique montagues using your new photos
You will post the 3 images and their titles and a 3 sentence Artist Statement about each one to your Weebly page titled Abstract or Project 11.
How To Step by Step
1. Before you begin this project you will need to have all your images in a folder and resize them in Preview. Tools- Adjust size- 4 inches by 5.33 inches.


2. Once all your images are resized, you will need to open Photoshop and create a NEW 8 x 10 or 10 x 8 FILE. File- New.

3. Make.sure to title your piece (change the Untitled-2). Make sure the dropdown is inches.
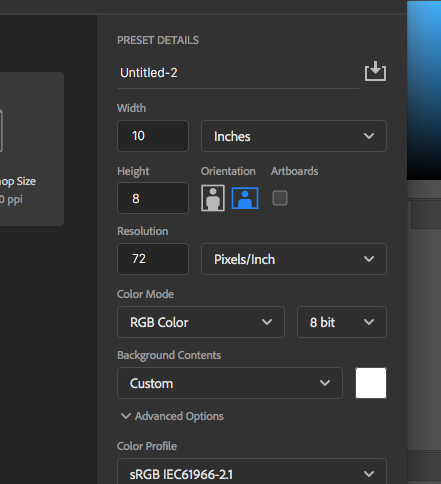
4. Leave the background white for now.

5. With the folder open in your Finder, drag the first image in. And while it is selected, make it smaller, tilt it and move it into a position. Hit the checkmark, enter or return to place it.


6. If you lose the ability to move your image, click on it, use the move tool or hit command + t to Transform it.

7. Continue to add your images. You need to size them individually once they are placed in PS. It is a collage so they do not have to be straight unless you want the image to be.


7. You can rearrange the layers. Click on the layer and drag the selected one up and down. Use the Move tool to move and Transform tool (command t) to resize and angle.

8. To add color to the background layer, find the Eyedropper (click on i to get it) and click on on image to extract a complimentary color.

9. It will select a color.

10. Find the Paint Bucket (grouped with the Gradient tool) and click on it.


10. Select the background layer if you did not already and click the background layer with the paint bucket and it will paint the background.


11. Save the file as a .PSD and take a screenshot of the finished piece because it will be to BIG or HUGE for Weebly. Post with a title and artist statement. You need 3.